Transfer data with CCIP
The Chainlink Cross-Chain Interoperability Protocol (CCIP) allows smart contracts deployed on different blockchain networks to communicate between each others (which would normally not be possible).
Chainlink having recently released the version 1.2 of CCIP, we will use it to build a simple example showing how to send a message from one chain to another.
Big picture
The simplified big picture is as follows. A sender contract deployed on the first chain will contact CCIP to transfer a message to a specific receiver on a destination chain.
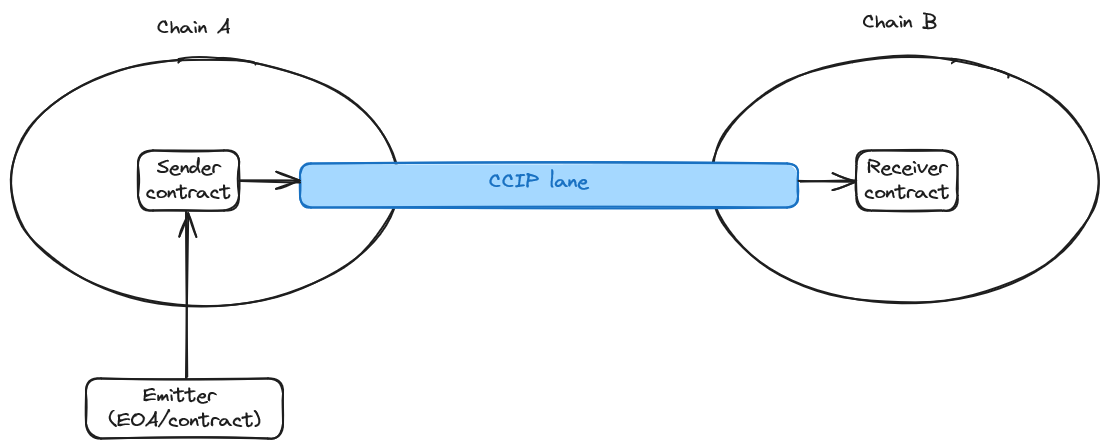
CCIP itself is accessed via a router, which is common to all the lanes on the network. The router will then transfer the messages to the specific OnRamp depending on the destination network. See the more detailed diagram of a CCIP transfer process below (taken from Chainlink doc):
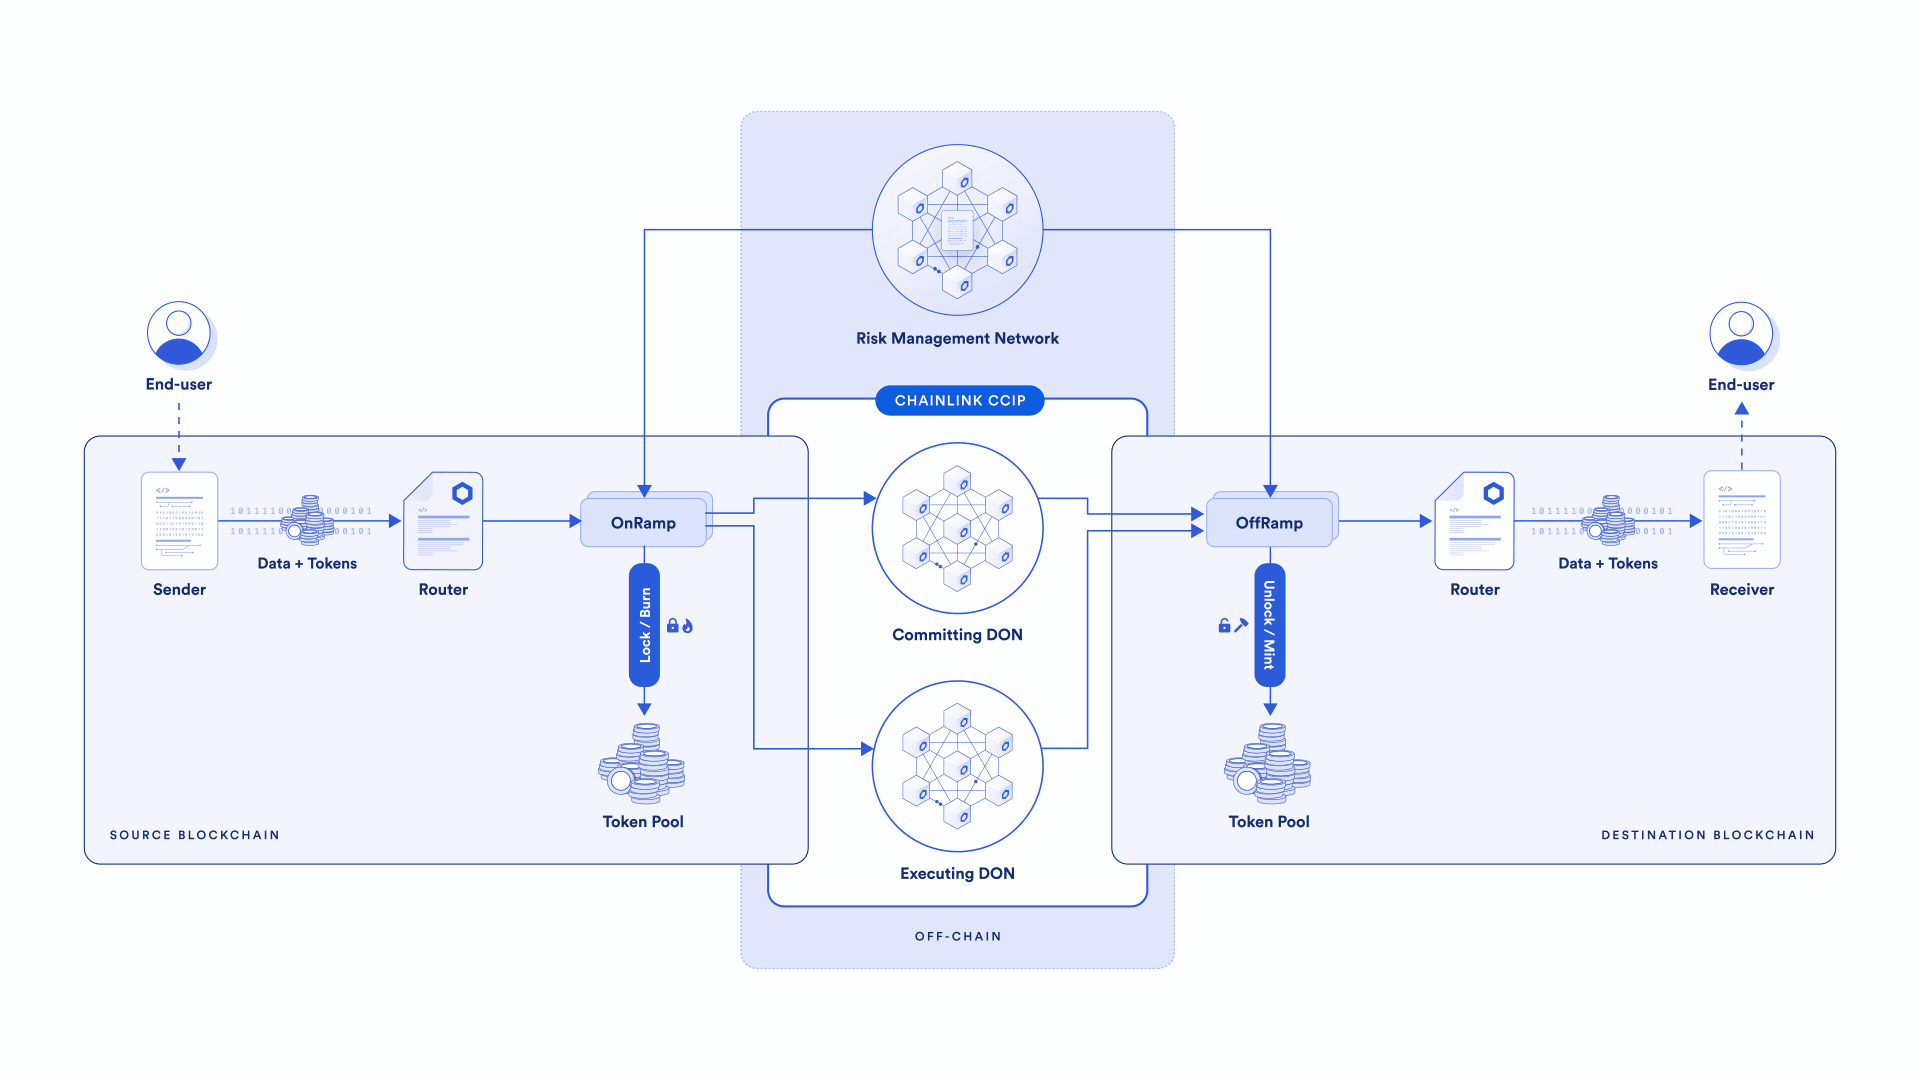
If you are interested in more details about the DONs, risk management network and other components, please have a look at the official CCIP documentation.
Solidity contracts
In our case, we will transfer a simple text message from the Ethereum Sepolia network to the Polygon Mumbai network. Therefore, we need to deploy a Sender contract on Sepolia and a Receiver contract on Mumbai.
Start by creating a Web3j project as seen previously.
Sender contract
Chainlink provided a sample Sender contract in their documentation.
We will use this contract, but feel free to build your own solution based on it.
You can deploy the contract using Remix, but in our case we will add it to our project to generate the Java wrappers.
Download the Solidity source code as Sender.sol in the contracts directory.
Receiver contract
Same as the sender, we will use the sample Receiver contract provided by Chainlink.
Download the Solidity source code as Receiver.sol in the contracts directory.
Generate wrappers
Download Solidity dependencies
To generate the wrappers, we need first to download the dependencies of the Sender and Receiver contracts. Using npm:
npm install @chainlink/contracts
npm install @chainlink/contracts-ccip
npm install @openzeppelin/contracts
This will create a node_modules directory with the required dependencies.
You may need to adjust the import path in your contracts, for example in the Sender:
import {IRouterClient} from "@chainlink/contracts-ccip/src/v0.8/ccip/interfaces/IRouterClient.sol";
may need to be changed to:
import {IRouterClient} from "../../node_modules/@chainlink/contracts-ccip/src/v0.8/ccip/interfaces/IRouterClient.sol";
depending on your project structure.
Run generate
Run the generate-sources target of the Web3j plugin to get the wrappers for our contracts.
If there is no error, you should get all the Java wrappers including the ones for the Sender and Receiver contracts.
Deploy contracts
We will deploy the Sender contract on Ethereum Sepolia and the Receiver contract on Polygon Mumbai. If you don’t want to deploy the contracts yourself, you can skip the deployment part and use directly the ones I deployed (the addresses are written below).
Deploy Sender
Following snipet shows how to deploy the Sender contract on Ethereum Sepolia using its wrapper. You will need an Ethereum node client and an Ethereum account with enough sETH to deploy the contract. The router addresses for testnet can be found here.
private static final String LINK_SEPOLIA_ADDRESS = "0x779877A7B0D9E8603169DdbD7836e478b4624789";
private static final String CCIP_ROUTER_SEPOLIA = "0x0bf3de8c5d3e8a2b34d2beeb17abfcebaf363a59";

private static void deploySender() throws Exception {
    Configuration config = new Configuration();
    Web3jService ethereumService = new HttpService(config.getEthereumTestnetUrl());
    Web3j web3jEth = Web3j.build(ethereumService);

    Credentials credentials = Credentials.create(config.getPrivateKey());
    ContractGasProvider gasProvider = new DefaultGasProvider();

    Sender sender = Sender.deploy(web3jEth, credentials, gasProvider, CCIP_ROUTER_SEPOLIA, LINK_SEPOLIA_ADDRESS).send();
    Address senderAddress = new Address(sender.getContractAddress());
    log.info("Deployed Sender at: {}", senderAddress);
}
Run this code then wait for the transaction to be confirmed (adjust gas price if required). After a while you get:
Deployed Sender at: 0x7952972249afa780f0d17d40cf603afdf333ffb5
Deploy Receiver
Remember that the Receiver has to be deployed on the destination chain, i.e. Polygon Mumbai in our case, not on Sepolia! Ensure that you have enough funds on your account on Mumbai then deploy the Receiver:
private static final String CCIP_ROUTER_MUMBAI = "0x1035cabc275068e0f4b745a29cedf38e13af41b1";
private static final int CHAIN_ID_POLYGON_MUMBAI = 80001;

private static void deployReceiver() throws Exception {
    log.debug("Will deploy Receiver contract...");
    Configuration config = new Configuration();
    Web3jService polygonService = new HttpService(config.getPolygonTestnetUrl());
    Web3j web3jMatic = Web3j.build(polygonService);

    Credentials credentials = Credentials.create(config.getPrivateKey());
    TransactionManager txManager = new RawTransactionManager(web3jMatic, credentials, CHAIN_ID_POLYGON_MUMBAI);
    ContractGasProvider gasProvider = new DefaultGasProvider();
    Receiver receiver = Receiver.deploy(web3jMatic, txManager, gasProvider, CCIP_ROUTER_MUMBAI).send();
    Address receiverAddress = new Address(receiver.getContractAddress());
    log.info("Deployed Receiver at: {}", receiverAddress);
}
Deployed Receiver at: 0x85f2af0e58a3ac8c91d37cd7ba9bb005d706caad
Perform CCIP transfer
Now that we have our contracts code, we can start writing a program to perform a simple message transfer via CCIP.
Fund the Sender
The Sender contract will have to pay for the CCIP transaction. Although it could pay in ETH, it’s cheaper to pay in LINK (Chainlink token). You will therefore need to fund you Sender contract with LINK tokens. If you need testnet LINK, you can use this LINK faucet.
CCIP transaction
Now let’s use our deployed sender and receiver contracts to perform a CCIP transfer. The main steps we follow are:
- transferring some LINK tokens to the Sender contract on Sepolia (used by the Sender to pay for the CCIP transaction).
- calling the sendMessage function on the sender with the destination contract and the message content as parameters.
- waiting for the transaction to be mined: this can take quite a lot of time depending on the lane since the block has to be finalized. In our case (Sepolia->Mumbai), it will take around 15’. Try the other way and see how fast it goes!
- listen to messages on the Receiver contract on the destination chain (Mumbai). NB: you have to use a WebSocket (WS) client to use events with Web3j.
- get notified of the received message!
- additionally, we query the Receiver contract directly to get the last received message (it should be the same).
Here is the commented source code (without the configuration) below:
public static void main(String[] args) throws ConfigurationException, URISyntaxException, IOException {
    Configuration config = new Configuration();
    Web3jService ethereumService = new HttpService(config.getEthereumTestnetUrl());
    Web3j web3jEth = Web3j.build(ethereumService);
    Web3jService polygonService = new HttpService(config.getPolygonTestnetUrl());
    Web3j web3jMatic = Web3j.build(polygonService);
    WebSocketService wsServiceMumbai = new WebSocketService(new WebSocketClient(new URI(config.getPolygonTestnetWsUrl())), false);
    Web3j web3jMaticWs = Web3j.build(wsServiceMumbai);
    wsServiceMumbai.connect();
    try {
        testCCIP(web3jEth, web3jMatic, web3jMaticWs, config);
    } catch (Exception e) {
        log.error(e.getMessage(), e);
    } finally {
        web3jEth.shutdown();
        web3jMatic.shutdown();
        web3jMaticWs.shutdown();
    }
}

private static void testCCIP(Web3j web3jEth, Web3j web3jMatic, Web3j web3jMaticWs, Configuration config) throws Exception {
    Credentials credentials = Credentials.create(config.getPrivateKey());
    ContractGasProvider gasProvider = new DefaultGasProvider();

    ERC20 link = getSepoliaLINK(web3jEth, credentials, gasProvider);

    // Use deployed Sender.
    String senderAddress = "0x7952972249afa780f0d17d40cf603afdf333ffb5";
    Sender sender = Sender.load(senderAddress, web3jEth, credentials, gasProvider);

    // Transfer LINK to Sender.
    BigInteger juels = new BigDecimal("0.1").multiply(BigDecimal.TEN.pow(18)).toBigInteger();
    log.info("Transferring {} juels to Sender contract at {}", juels, senderAddress);
    link.transfer(senderAddress, juels).send();

    // Use deployed Receiver.
    String receiverAddress = "0x85f2af0e58a3ac8c91d37cd7ba9bb005d706caad";
    Receiver receiver = Receiver.load(receiverAddress, web3jMatic, credentials, gasProvider);
    log.info("Loaded Receiver at: {}", receiverAddress);

    // Send data from Sender to Receiver.
    log.info("Sending message through CCIP...");
    TransactionReceipt tx = sender.sendMessage(CHAIN_SELECTOR_POLYGON_MUMBAI, receiverAddress, "Automated message between chains!").send();
    log.info("SendMessage Transaction: {} status: {}", tx.getTransactionHash(), tx.getStatus());
    String txHash = tx.getTransactionHash();
    TransactionReceiptProcessor trp = new PollingTransactionReceiptProcessor(web3jEth, TransactionManager.DEFAULT_POLLING_FREQUENCY, TransactionManager.DEFAULT_POLLING_ATTEMPTS_PER_TX_HASH);
    tx = trp.waitForTransactionReceipt(txHash);
    log.debug("Transaction {} mined on source chain at block {} (status {})", tx.getTransactionHash(), tx.getBlockNumber(), tx.getStatus());

    // Get last block of destination chain to start filter from.
    EthBlockNumber block = web3jMatic.ethBlockNumber().send();
    BigInteger from = block.getBlockNumber();
    log.debug("Filtering destination chain blocks from {} to latest", from);

    // Filters require WS connection (cannot use direct HTTP).
    EthFilter filter = new EthFilter(
        new DefaultBlockParameterNumber(from),
        DefaultBlockParameterName.LATEST,
        receiverAddress
    );
    Receiver receiverWs = Receiver.load(receiverAddress, web3jMaticWs, credentials, gasProvider);

    // Wait for our message to arrive at the destination chain.
    CountDownLatch latch = new CountDownLatch(1); // waiting for 1 message.
    Disposable disp = receiverWs.messageReceivedEventFlowable(filter)
        .onErrorResumeNext(s -> {log.error("Error while waiting for message: {}", s);})
        .subscribe(event -> {
            String msgId = Hex.encodeHexString(event.messageId);
            log.debug("New event of type 'MessageReceived' - event id {} from {}: {} (source chain {})",
                msgId,
                event.sender,
                event.text,
                event.sourceChainSelector);
            if (event.sender.equals(senderAddress) && event.sourceChainSelector.equals(CHAIN_SELECTOR_ETHEREUM_SEPOLIA)) {
                log.info("RECEIVED MESSAGE THROUGH CCIP! from {}: '{}'", event.sender, event.text);
                latch.countDown();
            }
        });
    log.info("Waiting for the message to arrive at the destination chain...");
    latch.await();
    disp.dispose();

    // Call the receiver to get its last received message.
    Tuple2<byte[], String> msg = receiver.getLastReceivedMessageDetails().send();
    String msgId = Hex.encodeHexString(msg.component1());
    log.info("[Receiver] last received message id 0x{}, content: '{}'", msgId, msg.component2());
}
Running this program will lead to the following output:
INFO ccip.DemoCCIP - Transferring 100000000000000000 juels to Sender contract at 0x7952972249afa780f0d17d40cf603afdf333ffb5
INFO ccip.DemoCCIP - Loaded Receiver at: 0x85f2af0e58a3ac8c91d37cd7ba9bb005d706caad
INFO ccip.DemoCCIP - Sending message through CCIP...
INFO ccip.DemoCCIP - SendMessage Transaction: 0x25340a7f2d751ffe19f6e94c434b9caf2764ad3d88ebdb6579981ef4a1316458 status: 0x1
DEBUG ccip.DemoCCIP - Transaction 0x25340a7f2d751ffe19f6e94c434b9caf2764ad3d88ebdb6579981ef4a1316458 mined on source chain at block 4865713 (status 0x1)
DEBUG ccip.DemoCCIP - Filtering destination chain blocks from 43442059 to latest
INFO ccip.DemoCCIP - Waiting for the message to arrive at the destination chain...
DEBUG ccip.DemoCCIP - New event of type 'MessageReceived' - event id f419e424c37627cc61f06e9a1c1e03afc54525630ec8499624a1cdb0cef92fa2 from 0x7952972249afa780f0d17d40cf603afdf333ffb5: Automated message between chains! (source chain 16015286601757825753)
INFO ccip.DemoCCIP - RECEIVED MESSAGE THROUGH CCIP! from 0x7952972249afa780f0d17d40cf603afdf333ffb5: 'Automated message between chains!'
INFO ccip.DemoCCIP - [Receiver] last received message id 0xf419e424c37627cc61f06e9a1c1e03afc54525630ec8499624a1cdb0cef92fa2, content: 'Automated message between chains!'
Conclusion
In this guide, we saw how to use CCIP to transfer a message between two different blockchains in an automated way.
comments powered by Disqus