Swagger for a Play framework application
In this guide we will see how to create a Swagger interface (including a UI) for a Play application.
Swagger is a widely adopted tool to document your API, and allows users to access it directly with an automatically generated interface with Swagger UI. It can be used with a Play application, which is nice since Play is a very convenient way to build a RESTFUL service.
Dependencies
In your build.sbt, add the following lines:
libraryDependencies ++= Seq(
  "com.github.dwickern" %% "swagger-play2.8" % "3.1.0",
  "io.swagger" % "swagger-core" % "1.6.2",
  "com.fasterxml.jackson.module" %% "jackson-module-scala" % "2.11.1"
)
libraryDependencies += "org.webjars" % "swagger-ui" % "4.17.0"
The first dependency directive add Swagger itself, and the second add Swagger UI (the generated Web interface for your API). It relies on Webjars to handle this dependency. This is assuming we are using Play 2.8.8+. For other versions please refer to the project homepage. We rely on this fork of play-swagger since the initial project do not support Play 2.8.
Configure the Swagger plugin to use the default implementation provided. E.g. in your Module.java:
public class Module extends AbstractModule {
    @Override
    protected void configure() {
        bind(SwaggerPlugin.class).to(SwaggerPluginImpl.class);
    }
}
Then enable the Swagger module in your application.conf:
enabled += "play.modules.swagger.SwaggerModule"
At this point we have the dependencies configured, now we need to add annotations on managed endpoints.
Annotate the controller
Swagger relies on annotations on your API. Let say you want to build a car management API. As an example, we can write a simple controller providing some API to a car storage:
@Api(value = "/car", tags = "Car API")
public class ApiController extends Controller {

    @ApiOperation(value = "Return the list of cars", httpMethod = "GET")
    public Result getCars() {
        // You may want to query a database or call other services here...
        ObjectMapper mapper = new ObjectMapper();
        ArrayNode array = mapper.createArrayNode();

        ObjectNode node = mapper.createObjectNode();
        node.put("id", 103);
        node.put("brand", "Peugeot");
        node.put("model", "403");
        array.add(node);

        node = mapper.createObjectNode();
        node.put("id", 108);
        node.put("brand", "Peugeot");
        node.put("model", "806");
        array.add(node);

        return ok(array);
    }

    @ApiOperation(value = "Return a car identified by its id", httpMethod = "GET")
    public Result getCar(@ApiParam(value = "The car identifier") Long id) {
        // You may want to query a database or call other services here...
        ObjectMapper mapper = new ObjectMapper();
        ObjectNode node = mapper.createObjectNode();
        node.put("id", id);
        node.put("brand", "Bugatti");
        node.put("model", "Veyron");
        return ok(node);
    }
}
The following route will be added to the routes file:
GET /api/car/:id controllers.CarController.getCar(id: Long)
To generate the swagger.json at the root of the application, use the built-in controller:
GET /swagger.json controllers.ApiHelpController.getResources
If you open your application at this address (by default http://localhost:9000/swagger.json), you should see a JSON file containing the annotated API you defined before.
Swagger UI
Once your swagger.json is available, you can use Swagger UI to get a nice user-friendly interface for your API. To do so, you rely on the swagger-ui webjar. It is nice to create a route for redirecting to the index.html of the webjar. You can add this to your home controller, or a Swagger specific one:
public class SwaggerController extends Controller {
    public Result swaggerUi() {
        return redirect("/assets/lib/swagger-ui/index.html?url=/swagger.json");
    }
}
This will redirect to the location of the deployed webjar. If you do not specify the optional url parameter, Swagger UI will be displayed on the test petshop application. Note that the url parameter corresponds to the path you set above for the swagger.json resource.
Then add the route for Swagger UI to the routes file:
GET /swagger controllers.SwaggerController.swaggerUi
Additional configuration can be specified in your application.conf file. Specifying both http and https
schemes is required if you want to be able to test your application locally without https:
swagger.api {
  basepath = "/api"
  schemes = ["http", "https"]
  info {
    title = "Demo for Swagger"
    description = "This is a simple demo app to demonstrate Swagger UI integration."
  }
}
If you open your browser on http://localhost:9000/swagger, you should see the Swagger UI interface:
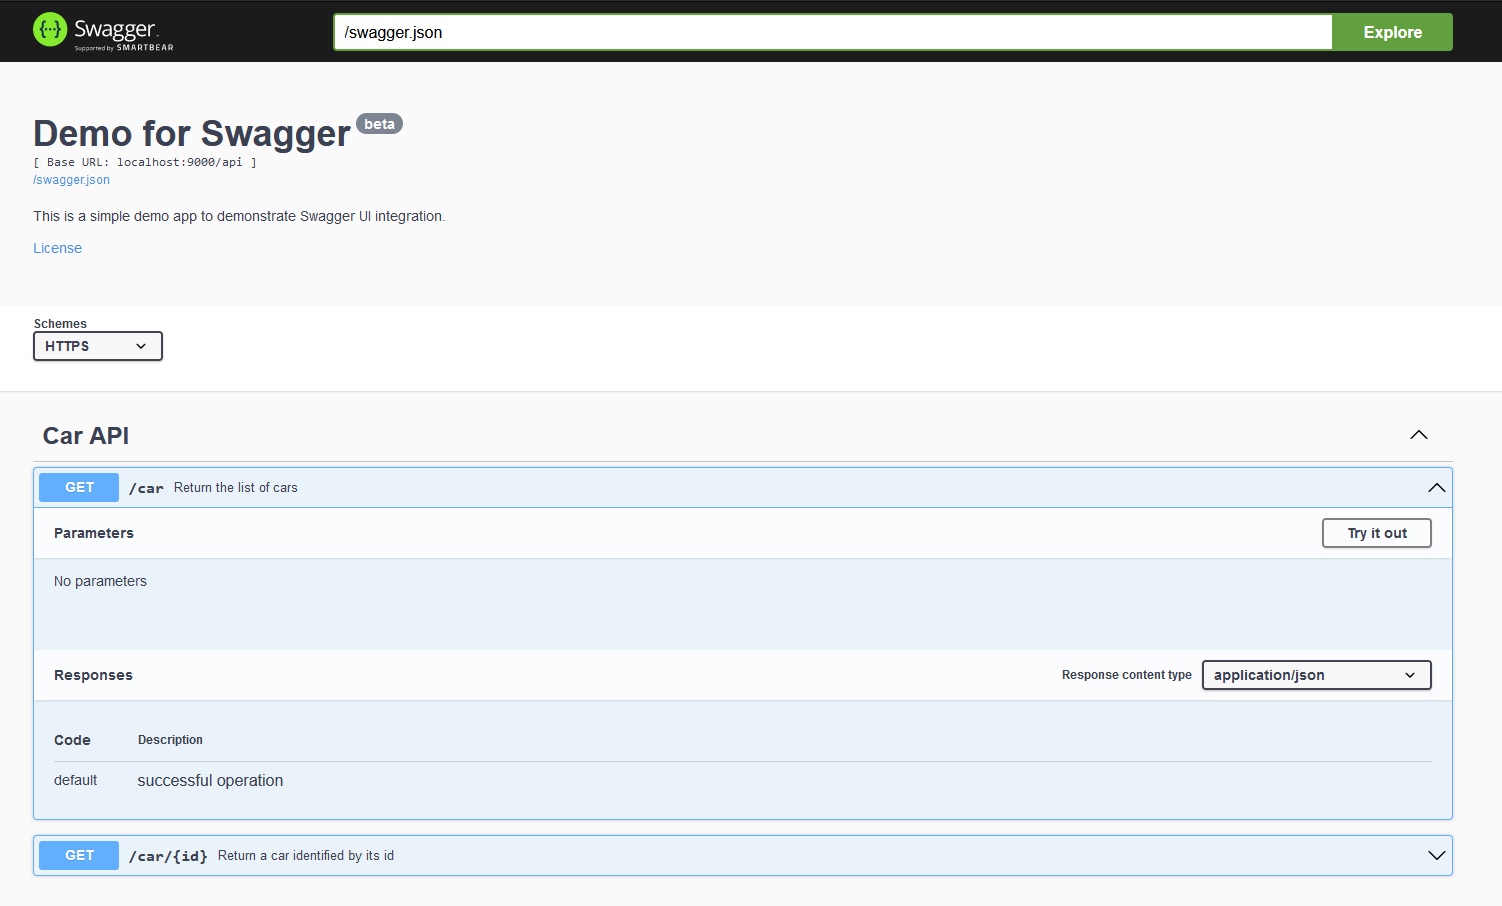
Depending on the Swagger UI version, you may have to specify manually the location of the Swagger config
in the “explore” field (e.g. /swagger.json).
You can use Swagger UI to test your API and perform calls. If you change your API during development, a simple refresh should update the Swagger UI interface, which is convenient for testing.
comments powered by Disqus